| 일 | 월 | 화 | 수 | 목 | 금 | 토 |
|---|---|---|---|---|---|---|
| 1 | 2 | 3 | 4 | 5 | ||
| 6 | 7 | 8 | 9 | 10 | 11 | 12 |
| 13 | 14 | 15 | 16 | 17 | 18 | 19 |
| 20 | 21 | 22 | 23 | 24 | 25 | 26 |
| 27 | 28 | 29 | 30 |
- JavaScript
- 제어유닛
- MongoDB
- Nodemon
- pug
- react
- 자바스크립트
- 연결자료구조
- 자바스크립트 배열
- Express
- 프론트엔드
- mongoose
- 유튜브 클론코딩
- 모던 자바스크립트 Deep Dive
- 후위표기법연산
- 리액트
- 마이크로명령어
- 보조저장장치
- node.js
- 표현식과 문
- 후위표기법변환
- 컴퓨터 구조
- 제어유니트
- Session
- 자료구조
- CPU
- 유튜브클론코딩
- 깃허브 로그인
- 컴퓨터 구조론
- cookie
- Today
- Total
909 Devlog
[유튜브 클론코딩] mongoDB - CRUD 본문
1. Create Video
이전 포스팅에서 video schema를 만들었습니다.
그 스키마에서 사용자에게 입력받아야 하는 것은 title과 desciption 그리고 hashtags들입니다.
입력값을 얻기 위해 form을 만들러 가봅시다.
upload.pug를 다음과 같이 수정합니다.
extends base.pug

block content
    form(method="POST")
        input(placeholder="Title", required, type="text", name="title")
        input(placeholder="Description", required, type="text", name="description")
        input(placeholder="Hashtags, separated by comma.", required, type="text", name="hashtags")
        input(type="submit", value="Upload Video")
모든 input에 name 속성을 달아주었고, 모든 정보가 필수적으로 있어야 하니 required를 달아줬습니다.
그럼 이제 입력값 얻을 수 있는 form이 완성되었으니 값을 활용하기 위해 videoController.js에서 postUpload 컨트롤러를 수정합시다.
export const postUpload = (req, res) => {
const {title, description, hashtags} = req.body;
return res.redirect('/');
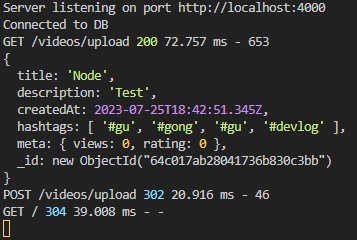
};req.body (form)에서 title, description, hashtags를 받아서 정상적으로 작동하는지 확인하기 위해 출력해 봅시다.
다음과 같이 입력하여

다음과 같이 출력되었습니다.

form의 입력값들을 정상적으로 받아왔으니 데이터베이스에 저장할 차례입니다.
데이터베이스에 저장하기 위해서는 document를 만들고, 그 document를 데이터베이스에 저장해야 합니다.
postUpload 컨트롤러를 다음과 같이 수정합니다.
export const postUpload = (req, res) => {
    const {title, description, hashtags} = req.body;
    const video = new VideoModel({
        title: title,
        description: description,
        hashtags: hashtags.split(",").map(word => `#${word.trim()}`),
        createdAt: Date.now(),
        meta: {
            views: 0,
            rating: 0,
        },
    });
    console.log(video);
    return res.redirect('/');
};
이전과 똑같이 입력하면, 다음과 같은 결과물이 출력됩니다.
이전에 만들어 뒀던 schema를 이용하여, 입력받은 정보를 document 형태로 만들었습니다.
title과 desciption은 사용자가 입력한 값 그대로 저장했으며,
createdAt은 사용자가 입력한 값을 저장한 시간을 저장했고,
hashtags를 ","을 기준으로 나눈 뒤 각각의 앞, 뒤 공백을 없애고 문자의 앞에 #를 붙여줬습니다.
meta 정보는 기본값 0을 부여했습니다.
_id는 mongoose가 자동으로 부여해준 랜덤값으로, 저장될 document의 고유식별번호입니다.
입력값도 정상적으로 받았고, document도 잘 만들었으니 데이터를 데이터베이스에 저장해 봅시다.
데이터베이스에 데이터를 저장하는 코드는 save()입니다.
우리가 video document를 new VideoModel로 생성했기 때문에 save 함수가 사용가능한 것이며,
save함수는 promise를 return 해주는데, 이전 포스팅에서 promise를 알아봤듯이 코드는 save 작업이 끝날 때까지 기다리게 됩니다. 따라서, promise를 사용하기 위해 trending 함수에서 사용했던 async-await를 사용해줘야 합니다.
export const postUpload = async (req, res) => {
const {title, description, hashtags} = req.body;
const video = new VideoModel({
title: title,
description: description,
hashtags: hashtags.split(",").map(word => `#${word.trim()}`),
createdAt: Date.now(),
meta: {
views: 0,
rating: 0,
},
});
await video.save();
return res.redirect('/');
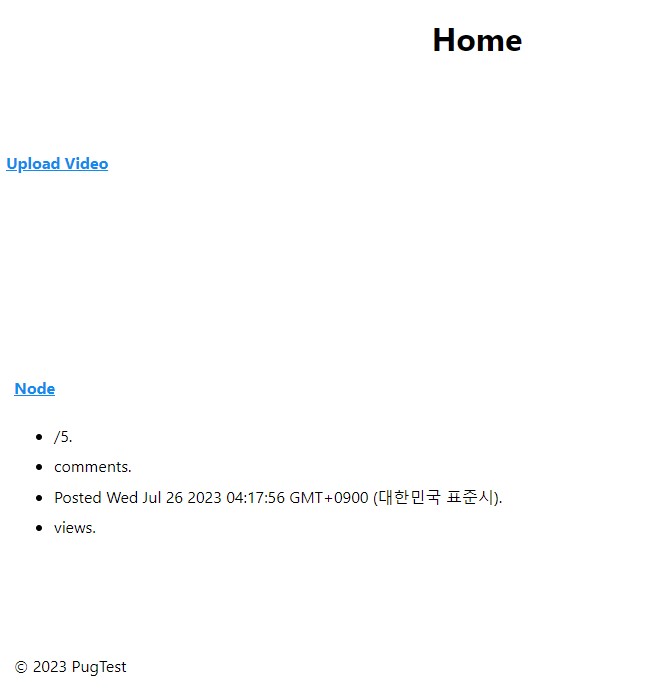
};이제 다시 upload form에 정보를 입력하고 submit 버튼을 누르면 홈에 다음과 같이 저장된 video 정보가 출력되게 됩니다.
데이터베이스에 데이터가 저장되었기 때문에, 브라우저와 서버를 새로고침해도 정보가 지워지지 않을 것입니다.
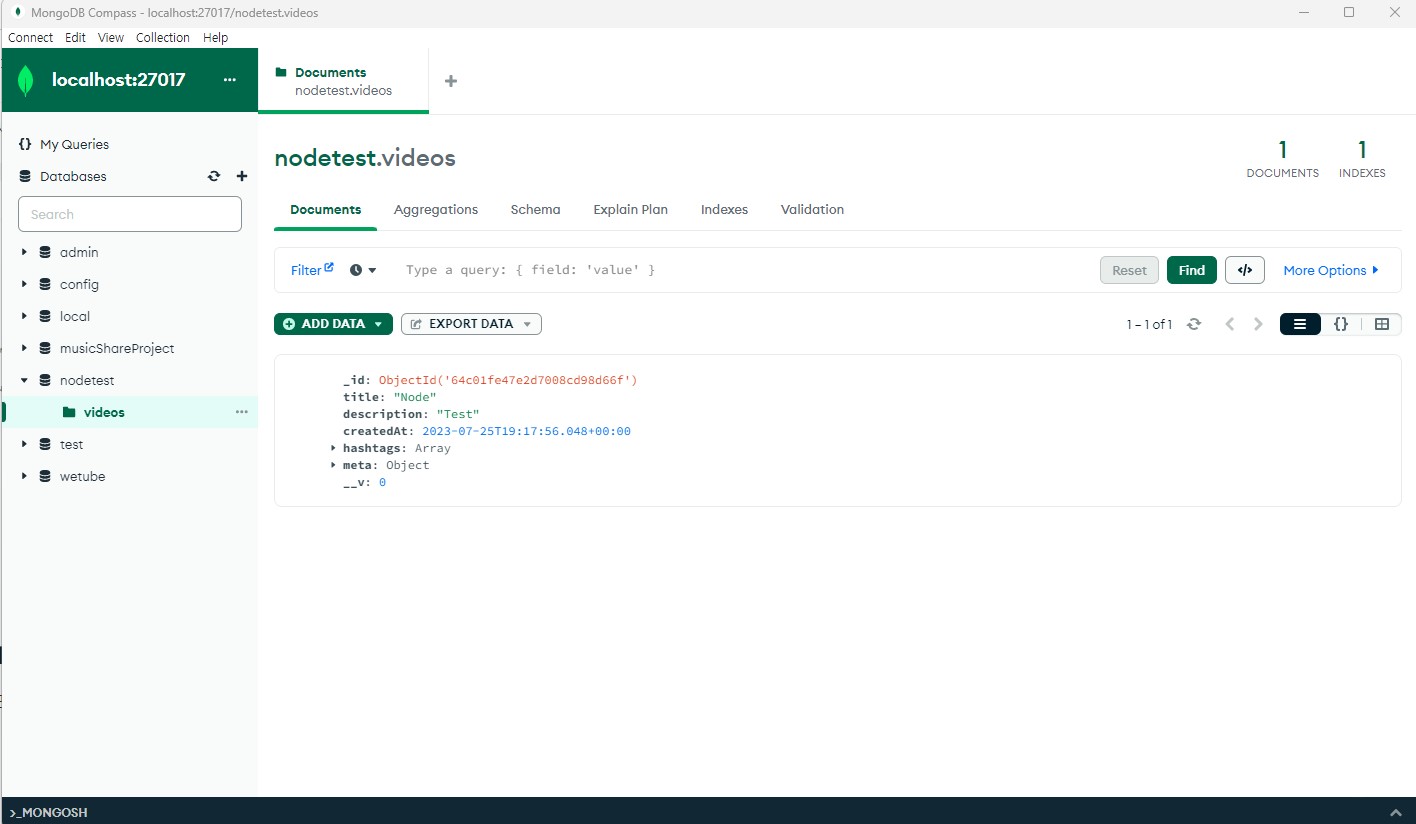
저장한 데이터가 데이터베이스가 잘 저장되었는지 확인하고 싶으시면 MongoDBCompass에서 쉽게 확인하실 수 있습니다.
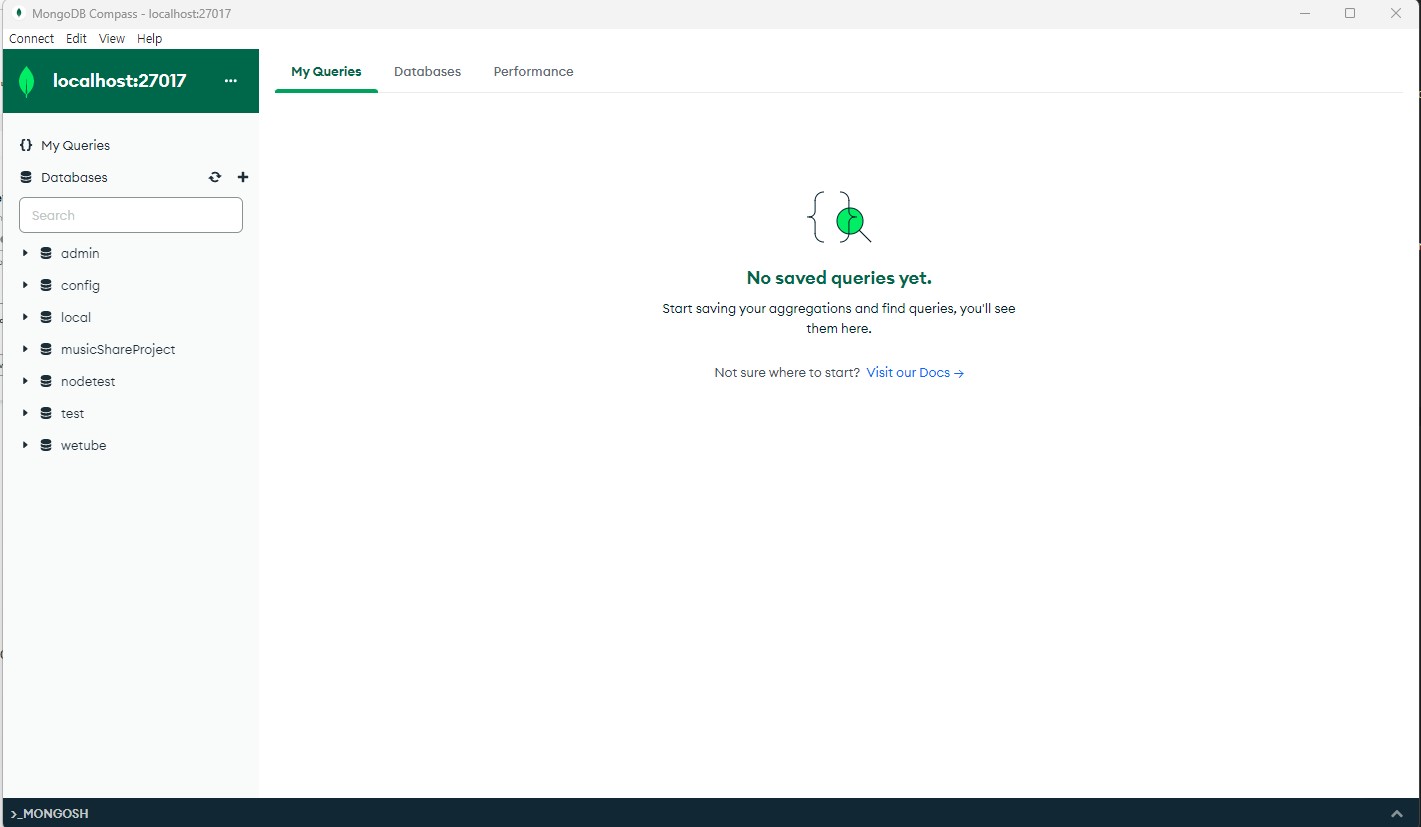
MongoDBCompass를 켜면, 다음과 같은 화면이 나오는데
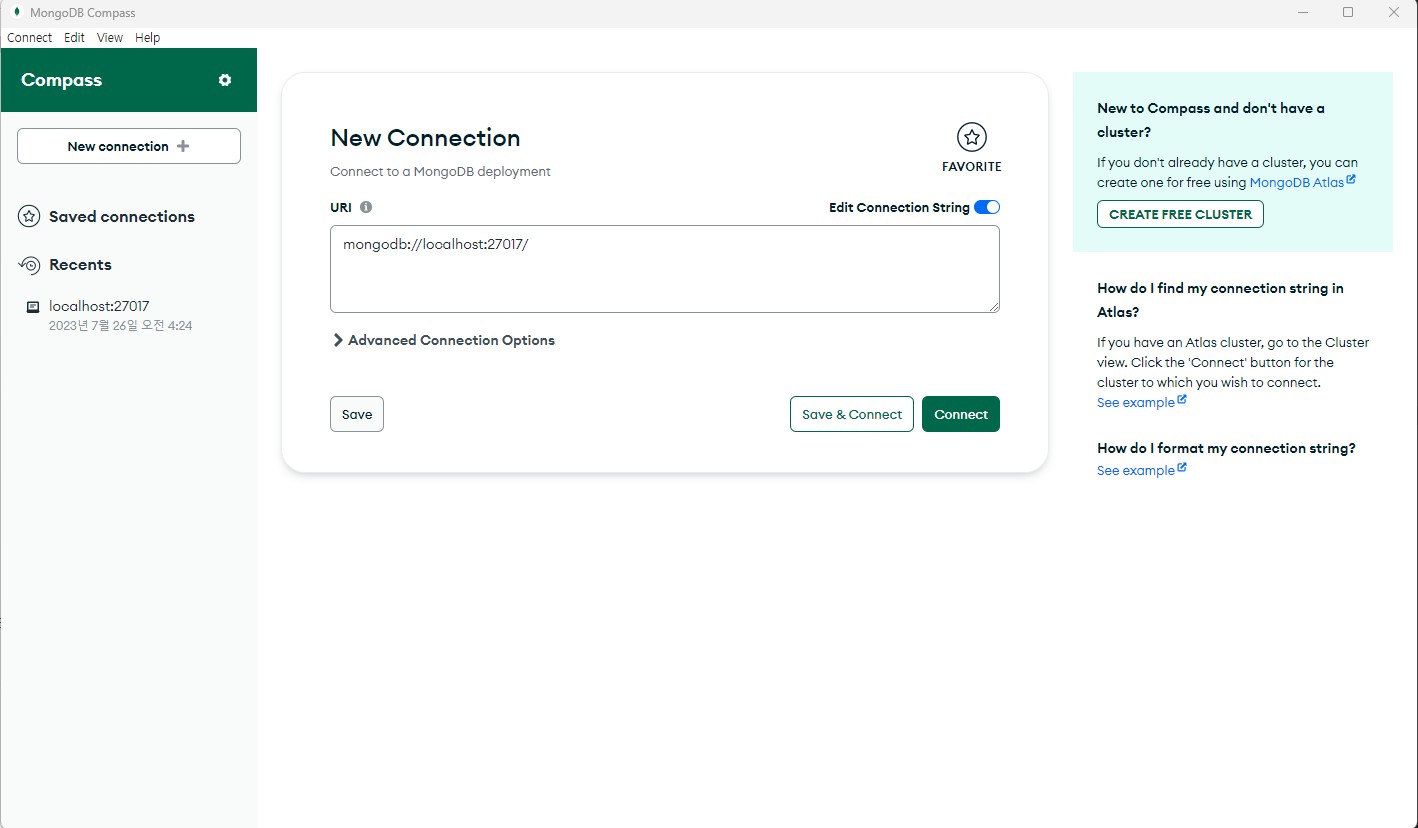
URI을 입력하는 부분에 mongodb://localhost:27017을 입력하시면 다음과 같은 화면이 나옵니다.
왼쪽에 각자 만드신 프로젝트명을 클릭하고 videos 폴더를 열면 저장된 데이터를 확인할 수 있습니다.
위에서 했던 document를 생성하고 save 하는 작업을 create 함수를 이용해 다음과 같이 더 간단하게 할 수 있습니다.
export const postUpload = async (req, res) => {
    const {title, description, hashtags} = req.body;
    await video.create({
        title: title,
        description: description,
        hashtags: hashtags.split(",").map(word => `#${word.trim()}`),
        createdAt: Date.now(),
        meta: {
            views: 0,
            rating: 0,
        },
    });
    return res.redirect('/');
};
1.1 Exceptions and Validation
그런데 만약 postUpload 컨트롤러를 작성하는 과정에서, 예를 들어 다음과 같이 createdAt을 깜박하고 작성하지 않은 객체를 전달하면 어떻게 될까요?
export const postUpload = async (req, res) => {
    const {title, description, hashtags} = req.body;
    await video.create({
        title: title,
        description: description,
        hashtags: hashtags.split(",").map(word => `#${word.trim()}`),
        meta: {
            views: 0,
            rating: 0,
        },
    });
    return res.redirect('/');
};
데이터의 형식을 잘못 전달하면 schema에 데이터 형식을 이미 선언해 놨으니 오류가 발생하지만, 아예 전달 자체를 하지 않으면 오류가 발생하지 않습니다.
왜냐하면 mongoDB가 봤을 때는 그 데이터가 필수가 아니기 때문이죠, 우리가 upload.pug에 input의 속성에 required를 선언했듯이 schema에도 required를 선언해줘야 합니다.
Video.js를 다음과 같이 수정해 줍시다.
import mongoose from "mongoose";

const videoSchema = new mongoose.Schema({
    title: String,
    description: String,
    createdAt: {type: Date, required: true},
    hashtags: [{type: String}],
    meta: {
        views: Number,
        rating: Number,
    },
});

const VideoModel = mongoose.model("Video", videoSchema);
export default VideoModel;
이와 같이 mongoose에 type 선언을 구체적으로 할수록 좋지만, 이럼에도 코드를 작성하다 실수할 수도 있습니다.
await에서 오류가 발생하면 브라우저가 무한 로딩에 걸리기 때문에, 다음과 같이 try-catch 문을 사용해 무한 로딩을 방지하고, 에러가 발생했을 때, 에러 종류를 render에 전달해 봅시다.
export const postUpload = async (req, res) => {
    const {title, description, hashtags} = req.body;
    try{
        await video.create({
            title: title,
            description: description,
            hashtags: hashtags.split(",").map(word => `#${word.trim()}`),
            createdAt: Date.now(),
            meta: {
                views: 0,
                rating: 0,
            },
        });
        return res.redirect('/');
    } catch(error) {
        return res.render('upload', {pageTitle: "Upload Video"}, errorMessage: error._message);
    }
};
catch의 render 함수에 errorMessage를 전달했으니, upload.pug로 가서 errorMessage를 표시할 공간을 만듭시다.
extends base.pug

block content
    if errorMessage
        span=errorMessage
    form(method="POST")
        input(placeholder="Title", required, type="text", name="title")
        input(placeholder="Description", required, type="text", name="description")
        input(placeholder="Hashtags, separated by comma.", required, type="text", name="hashtags")
        input(type="submit", value="Upload Video")
1.2 default
약간의 에러를 방지했습니다만, schema를 사용하는 모든 controller에 위에서 했던 것처럼 일일이 값을 입력하다 보면 실수도 발생할 수 있을뿐더러, 상당히 귀찮은 작업이 될 것입니다.
그럴 때를 위해 mongoose에는 default라는 것이 존재합니다.
Video.js를 다음과 같이 수정해 줍시다.
import mongoose from "mongoose";

const videoSchema = new mongoose.Schema({
    title: {type: String, required: true},
    description: {type: String, required: true},
    createdAt: {type: Date, required: true, default: Date.now},
    hashtags: [{type: String}],
    meta: {
        views: {type: Number, default: 0, required: true},
        rating: {type: Number, default: 0, required: true},
    },
});

const VideoModel = mongoose.model("Video", videoSchema);
export default VideoModel;
default를 사용하면 controller마다 값을 작성하지 않아도 자동으로 기본값이 저장될 것입니다.
코드를 잘 보시면 createdAt에 default의 값을 Date.now()가 아닌 Date.now로 설정했습니다.
Date.now()로 입력해 버리면, 사용자가 입력한 데이터를 저장한 시간이 아닌, schema가 있는 파일을 저장한 시간이 입력되기 때문에 ()를 작성하지 않는 것이 중요합니다.
createdAt과 meta는 default를 설정했으니 controller에서 해당 내용은 아래와 같이 삭제해도 정상적으로 작동합니다.
export const postUpload = async (req, res) => {
    const {title, description, hashtags} = req.body;
    try{
        await video.create({
            title: title,
            description: description,
            hashtags: hashtags.split(",").map(word => `#${word.trim()}`),
        });
        return res.redirect('/');
    } catch(error) {
        return res.render('upload', {pageTitle: "Upload Video", errorMessage: error._message});
    }
};
1.3 Schema 옵션
위에서 적용했던 required와 default처럼, schema에 적용할 수 있는 여러 가지 옵션은 아래 공식 문서에서 확인하실 수 있습니다. 예를 들어 최대, 최소 글자수를 설정하는 min, maxLength 등이 존재합니다.
https://mongoosejs.com/docs/schematypes.html
Mongoose v7.4.1: SchemaTypes
SchemaTypes handle definition of path defaults, validation, getters, setters, field selection defaults for queries, and other general characteristics for Mongoose document properties. You can think of a Mongoose schema as the configuration object for a Mon
mongoosejs.com
1.4 video ID
이전에는 우리가 데이터베이스에 등록되어 있는 video의 ID가 아닌, 우리가 직접 ID를 배열에 작성해서 사용했었습니다.
그때는 ID를 1, 2, 3처럼 숫자만 이용해서 작성해 주었는데, mongoDB에서 자동으로 부여해 주는 랜덤값은 숫자 외에 다른 문자도 포함하고 있습니다.
따라서, 홈페이지에서 video의 제목을 클릭해서 링크를 타면, 오류가 발생합니다. 라우터에서 ID가 숫자로만 구성되어 있는 URL을 받도록 설정해 두었기 때문입니다.
mongoDB의 ID를 가진 URL을 받기 위해서는 우리가 작성해 두었던 정규표현식을 수정해야 합니다.
그전에, mongoDB의 ID 구조를 알아봅시다.

공식 문서에 따르면, id는 24 바이트 16진수 문자열이라 정의되어 있습니다.
24 바이트는 24 글자라는 것을 알 수 있고, 16진수는 0 ~ F까지이므로, 이를 토대로 정규표현식을 만들면
/[0-9a-f]{24}/g라는 정규표현식이 나오고, 이를 videoRouter.js에 적용해 주면 코드는 다시 정상적으로 작동할 것입니다.
// videoRouter.js

...

videoRouter.get("/:id([0-9a-f]{24})", watch);
videoRouter.route("/:id([0-9a-f]{24})/edit").get(getEdit).post(postEdit);

...
링크를 클릭해서 watch 페이지에 도착하면 video가 undefined라는 오류가 발생합니다.
watch controller에 video를 전달해주지 않았기 때문에 발생하는 오류입니다.
watch.pug와 watch controller를 수정해 봅시다.
// watch.pug

extends base.pug

block content
    div
        p=video.description
        small=video.createdAt
    a(href=`${video.id}/edit`) Edit Video →
export const watch = async (req, res) => {
const {id} = req.params;
const video = await VideoModel.findById(id);
if(video){
return res.render("watch", {pageTitle: video.title, video: video});
}
return res.render("404", {pageTitle: "Video not found."});
};watch controller에서 처음 사용하는 model.findById()는 mongoose에서 지원하는 함수로써, 해당 모델에서 괄호 안에 입력한 ID와 동일한 데이터 하나를 찾아서 반환해 주는 함수입니다.
그런데 만약 누군가가 존재하지 않는 ID를 찾아본다면 어떻게 될까요?
코드는 URL의 id를 받아서 mongoDB 내에서 검색한 다음에 같은 ID를 가진 데이터가 없으면 null을 반환합니다.
그래서 페이지를 렌더링 할 때 pageTitle로 전달한 video.title이 null.title로 바뀌어 오류가 발생해 무한 로딩에 걸리게 됩니다.
위 코드의 if(video)는 그런 null 값들을 걸러주는 역할을 합니다.
null 값이 반환되면 렌더링 하게 되는 404.pug를 만들어봅시다.
// 404.pug

extends base.pug
2. Edit Video
이제 DB에 저장해 놓은 데이터를 수정하기 위한 Edit 페이지에 접속하기 위해 getEdit controller를 다음과 같이 수정합니다.
export const getEdit = async (req, res) => {
    const {id} = req.params;
    const video = await VideoModel.findById(id);
    if(video){
        return res.render("edit", {pageTitle: `Edit ${video.title}`, video: video});
    }
    return res.render("404", {pageTitle: "Video not found."});
};
또한, 제목 말고 다른 정보도 수정해야 하기 때문에, edit.pug를 다음과 같이 수정합니다.
extends base.pug

block content
    h5 Update Video
    form(method="POST")
        input(name="title", placeholder="Video Title", value=video.title, required)
        input(placeholder="Description", required, type="text", name="description", value=video.description)
        input(placeholder="Hashtags, separated by comma.", required, type="text", name="hashtags", value=video.hashtags.join())
        input(value="Save", type="submit")
input에 hashtags의 value는 video.hashtags가 배열이기 때문에, join으로 문자열로 변환시켰습니다.
이제 DB에 저장되어 있는 데이터를 form에서 받아온 입력값으로 교체시켜줘야 합니다.
교체시키는 방법엔 2가지 방법이 있는데,
첫 번째 방법으로는 우리가 이전에 사용했던 findById와 save를 이용하여 업데이트시켜주는 것입니다.
postEdit controller를 아래와 같이 수정합니다.
export const postEdit = async (req, res) => {
    const {id} = req.params;
    const {title, description, hashtags} = req.body;
    const video = await VideoModel.findById(id);
    if(video){
        video.title = title;
        video.description = description;
        video.hashtags = hashtags.split(",").map(word => word.startsWith('#') ? word : `#${word.trim()}`);
        await VideoModel.save();
        return res.redirect(`/videos/${id}`);
    }
    return res.render("404", {pageTitle: "Video not found."});
};
두 번째 방법은, 우리가 video를 만들었을 때 create 함수로 줄인 것처럼, 데이터 수정도 findOneAndUpdate 함수로 줄일 수 있습니다.
export const postEdit = async (req, res) => {
    const {id} = req.params;
    const {title, description, hashtags} = req.body;
    const video = await VideoModel.exists({_id: id});
    if(video){
        await VideoModel.findByIdAndUpdate(id, {
            title: title,
            description: description,
            hashtags: hashtags.split(",").map(word => word.startsWith('#') ? word : `#${word.trim()}`),
        });
        return res.redirect(`/videos/${id}`);
    }
    return res.render("404", {pageTitle: "Video not found."});
};
findOneAndUpdate는 첫 번째 인자로 id를 받으며, 두 번째 인자로 변경할 내용을 받습니다.
또한 이때까지 ID가 맞는 데이터를 찾기 위해 findById로 ID가 맞는 데이터를 불러왔었습니다. 그냥 해당 데이터가 있는지 검사하는 역할을 맡고 있기 때문에, 데이터 객체를 가져올 필요가 없으므로, exists 함수를 써서 boolean 값만 반환시키는 게 더 좋을 것 같습니다.
exists 함수는 id가 아닌 filter를 받으므로 schema에 있는 key 값을 전달하여 찾아볼 수 있습니다.
3. Middleware
이때까지 hashtags를 받아서 데이터를 저장하거나 업데이트할 때마다 전처리과정을 일일이 작성해줘야 했습니다.
이럴 때를 위해, mongoose에는 express와 같이 middleware가 존재합니다.
mongoose에서 pre middleware를 사용하는 방법은 아래와 같습니다.
Video.js를 다음과 같이 수정합니다.
import mongoose from "mongoose";

const videoSchema = new mongoose.Schema({
    title: {type: String, required: true},
    description: {type: String, required: true},
    createdAt: {type: Date, required: true, default: Date.now},
    hashtags: [{type: String}],
    meta: {
        views: {type: Number, default: 0, required: true},
        rating: {type: Number, default: 0, required: true},
    },
});

videoSchema.pre('save', async function(){
    this.hashtags = this.hashtags[0].split(",").map(word => word.startsWith("#") ? word : `#${word.trim()}`);
});

const VideoModel = mongoose.model("Video", videoSchema);
export default VideoModel;
pre middleware는 schema를 model로 만들기 전에 동작해야 합니다.
videoSchema.pre() 함수가 "save" 함수가 동작하기 전에 동작하는 middleware로써 첫 번째 인자로 middleware가 동작할 함수를 받고, 두 번째 인자로 콜백함수를 받습니다.
위 코드의 middleware는 데이터가 save 되기 전에 this(저장할 데이터)의 hashtags를 이전에 했던 것처럼 전처리를 해주게 됩니다.
3.1 static
우리가 위에서 middleware를 사용한 이유는, hashtags 전처리를 여러 controller에서 복붙 해서 사용하고 싶지 않기 때문입니다. 하지만 위에서 언급했듯 우리가 작성해 놓은 middleware는 "save" 함수가 호출되었을 때만 동작합니다.
따라서 postEdit controller에서 사용하는 "findByIdAndUpdate" 함수를 호출하면 우리가 작성해 놓은 middleware가 동작하지 않아서 우리가 의도한 방향과는 조금 다르게 middleware가 동작합니다.
이럴 때, static을 사용하여 위 문제를 보완할 수 있습니다.
static은 우리가 사용했던 save, exists, findByIdAndUpate 같은 함수를 우리가 직접 커스텀해 만들어 볼 수 있습니다.
Video.js에서 우리가 작성했던 middleware를 지우고 static를 직접 커스텀해서 만들어 봅시다.
Video.js를 아래와 같이 수정하고,
...

});

videoSchema.static('formatHashtags', function(hashtags){
    return hashtags.split(",").map(word => word.startsWith('#') ? word : `#${word.trim()}`);
});

const VideoModel = mongoose.model("Video", videoSchema);
videoController.js에서 hashtags를 전처리 했던 모든 부분에 static을 적용시켜 봅시다.
...

	await VideoModel.findByIdAndUpdate(id, {
            title: title,
            description: description,
            hashtags: VideoModel.formatHashtags(hashtags),
        });

...

	await video.create({
            title: title,
            description: description,
            hashtags: VideoModel.formatHashtags(hashtags),
        });

...
이제, findByIdAndUpdate와 create 모두 hashtags 전처리가 동작해서 우리가 의도했던 방법대로 middleware가 동작하게 되었습니다.
우리가 저장한 hashtags들을 브라우저에서 보기 위해 video.pug를 다음과 같이 수정해 봅시다.
mixin video(info)
    div
        h4
            a(href=`/videos/${info.id}`)=info.title
        p=info.description
        ul
            each hashtag in info.hashtags
                li=hashtag
        small=info.createdAt
        hr
그럼 이제 다음과 같이 home에서 데이터베이스에 있는 데이터의 title과 description, hashtags들을 볼 수 있습니다.

4. Delete Video
이제 저장한 데이터를 지워봅시다.
template, router, controller를 모두 사용해서, 이때까지 봤던 것들을 복습한 좋은 기회입니다.
데이터를 지우기 위해, watch.pug에서 delete Video 버튼을 만듭시다.
// watch.pug

extends base.pug

block content
    div
        p=video.description
        small=video.createdAt
    a(href=`${video.id}/edit`) Edit Video →
    br
    a(href=`${video.id}/delete`) Delete Video →
비디오 삭제에 대한 router를 만들어 주지 않았기 때문에 오류가 발생합니다.
videoController에서 해당 작업을 수행할 controller를 만들고 routing 해봅시다.
// videoController.js

...

export const deleteVideo = async (req, res) => {
    const {id} = req.params;
    await VideoModel.findByIdAndDelete(id);
    return res.redirect("/");
};
findByIdAndDelete 함수를 이용해 해당 데이터를 삭제합니다.
// videoRouter.js

...

videoRouter.route("/:id([0-9a-f]{24})/edit").get(getEdit).post(postEdit);
videoRouter.route("/:id([0-9a-f]{24})/delete").get(deleteVideo);
videoRouter.route("/upload").get(getUpload).post(postUpload);

...
위 코드를 다 작성하시고, watch 페이지에 들어가 delete Video 링크를 누르면 해당 video 데이터가 삭제될 것입니다.
5. Search Video
이제 마지막으로 영상을 검색해 봅시다.
4. delete video처럼, 영상을 검색해 보기 위한 페이지를 만들고, 컨트롤러를 만들어 라우터에서 사용해 봅시다.
base.pug에 검색 페이지로 가기 위한 버튼을 만들어 봅시다.
// base.pug

doctype html
html(lang="ko")
    head
        title #{pageTitle} | PugTest
        link(rel="stylesheet" href="https://unpkg.com/mvp.css")
    body
        header
            h1=pageTitle
        nav
            ul
                li
                    a(href="/videos/upload") Upload Video
                li
                    a(href="/") Home
                li
                    a(href="/search") Search
        main
            block content
    include partials/footer.pug
search template를 만들고, 아래와 같이 작성합니다.
// search.pug

extends base.pug

block content
    form(method="GET")
        input(placeholder="search by title", type="text", name="keyword")
        input(type="submit", value="Search")
form의 method를 보면 이때까지 사용하던 POST가 아닌 GET을 사용합니다.
GET과 POST의 차이점은 form method에서 보실 수 있습니다.
videoController에 search controller를 만들고,
export const search = async (req, res) => {
    return res.render('search', {pageTitle: "Search"})
};
globalRouter에 routing 해봅시다.
// globalRouter.js

import express from "express";
import { join, login } from "../controllers/userController";
import { home, search } from "../controllers/videoController";

const globalRouter = express.Router();
globalRouter.get("/", home);
globalRouter.get('/join', join);
globalRouter.get('/login', login);
globalRouter.get('/search', search);

export default globalRouter;
GET method를 사용함으로써, 입력값을 URL에 표시할 수 있습니다.
input에 검색값을 입력하고 submit 버튼을 누르면, URL이

에서

으로 변하는 것을 볼 수 있습니다.
우리는 이때까지 URL에 있는 변수를 req.params로 가져왔고, form의 입력값들을 req.body로 가져왔습니다.
이번에는 어떤 방법을 통해 입력값을 가져올 수 있을까요?
이번에는 form의 method를 GET으로 설정했기 때문에 req.query를 통해 입력값들을 가져올 수 있습니다.
URL을 보면 params와 비슷해 보이지만 query는?을 기준으로 URL과 데이터값이 구분되어 있으며,
form을 보면 body와 비슷해 보이지만 form의 method가 다르기 때문에 query를 사용해야 합니다.
이제 method가 GET인 form의 값을 가져올 수 있게 되었으니, 데이터베이스에 keyword 값으로 데이터를 검색하고 브라우저에 검색 결과를 표시해 봅시다.
search controller를 다음과 같이 수정하고
// videoController.js

export const search = async (req, res) => {
    const {keyword} = req.query;
    let videos = [];
    if(keyword){
        videos = await VideoModel.find({
            title: {
                $regex: new RegExp(`^${keyword}`, "i"),
            },
        });
    }
    return res.render('search', {pageTitle: "Search", videos: videos});
};
search.pug를 다음과 같이 수정하면
extends base.pug
include mixins/video

block content
    form(method="GET")
        input(placeholder="search by title", type="text", name="keyword")
        input(type="submit", value="Search")

    div
        each value in videos
            +video(value)
입력값을 담은 URL과
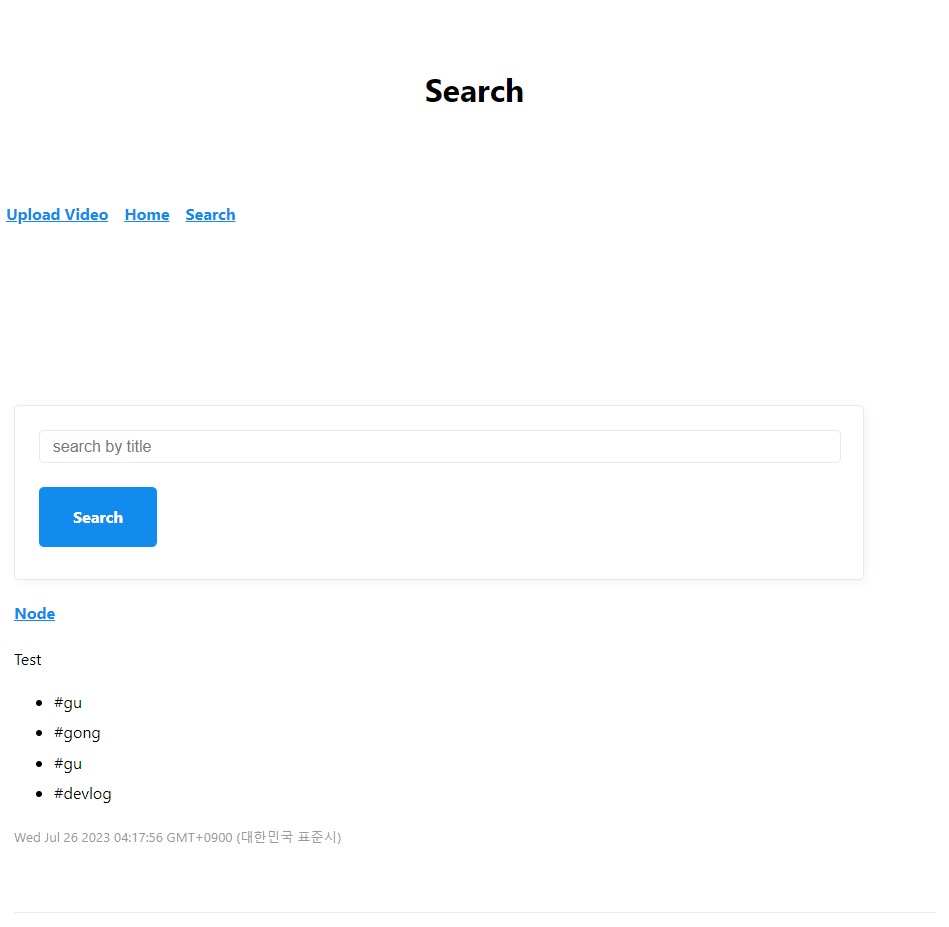
검색결과가 화면에 출력되는 것을 볼 수 있습니다.
'토이 프로젝트 > 유튜브 클론코딩' 카테고리의 다른 글
| [유튜브 클론코딩] GitHub Login (0) | 2023.08.04 |
|---|---|
| [유튜브 클론코딩] Sessions and Cookies (0) | 2023.08.01 |
| [유튜브 클론코딩] mongoDB - 기초부터 연결까지 (0) | 2023.07.24 |
| [유튜브 클론코딩] Pug (0) | 2023.07.23 |
| [유튜브 클론코딩] express 서버 라우팅 (0) | 2023.07.17 |


